Starting with How to Contour Your Face: 5 Steps to a Sculpted Look, this paragraph sets the stage for an exciting exploration into the world of contouring, offering valuable insights and tips to achieve a flawless sculpted look.
Exploring the basics of contouring, understanding your face shape, and mastering the art of blending, this guide will take you on a journey to enhance your facial features like a pro.
Steps to Contour Your Face

Contouring is a makeup technique that involves using darker and lighter shades to enhance and define the natural structure of your face. By strategically placing shadows and highlights, you can create the illusion of more defined cheekbones, a slimmer nose, and a sculpted jawline.
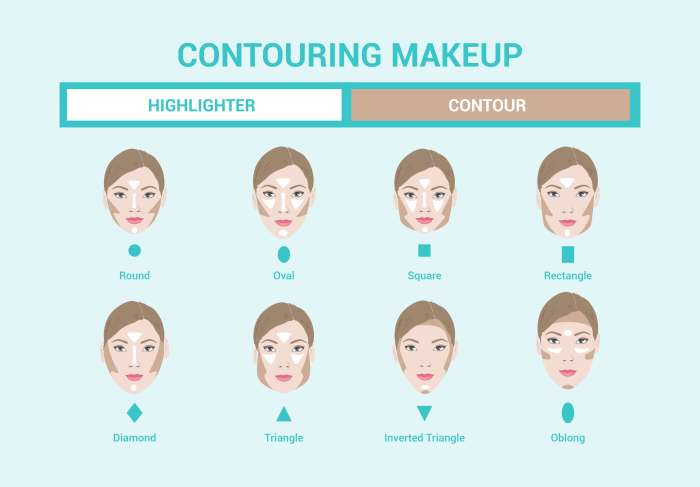
Knowing your face shape is crucial before contouring to ensure that you emphasize your best features and achieve a balanced look. Different face shapes require different contouring techniques, so take the time to identify whether you have a round, square, heart, oval, or diamond-shaped face.
Key Areas for Contouring
- Cheekbones: Contouring along the hollows of your cheeks can create the appearance of higher cheekbones.
- Forehead: Applying contour along the hairline can help to minimize the appearance of a larger forehead.
- Nose: Contouring the sides of the nose can make it appear slimmer and more defined.
- Jawline: Defining the jawline with contour can create a more sculpted and angular look.
Contouring Process Step by Step
- Start by applying a matte contour shade that is a few shades darker than your skin tone to the areas you want to define.
- Blend the contour shade well using a makeup brush or sponge to avoid harsh lines and achieve a natural look.
- Next, apply a highlighter to the high points of your face, such as the tops of your cheekbones, bridge of your nose, and cupid’s bow.
- Blend the highlighter to create a seamless transition between the contoured and highlighted areas.
- Set your contour and highlight with a translucent powder to ensure long-lasting wear.
Tools and Products for Contouring

Contouring requires specific tools and products to achieve a sculpted look that enhances your natural features.
Essential Tools for Contouring
- Contour Brush: A brush with angled bristles to help apply contour product precisely.
- Beauty Blender or Makeup Sponge: Used to blend and soften harsh lines for a seamless finish.
- Setting Powder Brush: To set the contour in place and blend any excess product.
Popular Contouring Products
- Cream Contour: Cream-based products offer a more natural and dewy finish, ideal for dry skin types.
- Powder Contour: Powder products are great for oily skin as they provide a matte finish and are easier to build up for intensity.
Differences Between Cream and Powder Contour
Cream contour products are best applied with fingers or a damp sponge, providing a more subtle and blendable look. On the other hand, powder contour is suitable for a more defined and structured contour, typically applied with a brush.
Tips for Selecting the Right Shade of Contour
- Choose a shade that is one to two tones darker than your natural skin tone for a subtle contour.
- Avoid shades that are too warm or orange-toned, as they can look unnatural on the skin.
- Test the contour shade on your jawline to ensure it blends seamlessly with your skin tone.
Tips for Achieving a Sculpted Look

When it comes to achieving a perfectly sculpted look through contouring, there are several key tips to keep in mind. From blending techniques to the right lighting, here are some important factors to consider.
Techniques for Blending Contour Seamlessly
- Start by applying your contour product in small, concentrated areas where you want to create shadows or definition.
- Use a clean makeup sponge or brush to blend out the contour lines in a gentle tapping or sweeping motion.
- Make sure to blend well along the edges of the contour to avoid any harsh lines or uneven patches.
- For a more natural look, blend the contour upwards towards your temples and hairline.
The Importance of Lighting When Contouring
Lighting plays a crucial role in how your contour looks. Natural lighting is the most flattering, as it shows the true colors and blending of your makeup. When contouring, try to position yourself in front of a window or in a well-lit room to ensure you are applying the right amount of product and blending effectively.
Tips for Avoiding Common Contouring Mistakes
- Avoid using too much product at once, as this can lead to a heavy, unnatural look.
- Choose a contour shade that is only slightly darker than your natural skin tone to prevent a muddy appearance.
- Blend, blend, blend – this cannot be stressed enough to achieve a seamless finish.
- Always remember to check your contour in different lighting to ensure it looks flattering from all angles.
Recommended Setting Powders or Sprays
After you have finished contouring, it’s important to set your makeup in place to ensure it lasts all day. Consider using a translucent setting powder to mattify and lock in your contour, or opt for a setting spray to keep everything in place for a long-lasting finish.
Last Recap
In conclusion, mastering the art of contouring with these 5 steps will elevate your makeup game, giving you the confidence to rock a sculpted look with ease. Say goodbye to common contouring mistakes and hello to a flawless finish that lasts all day.